


Description: Explore 7 essential real-estate photo editing techniques to boost your listings, including virtual staging, object removal, noise reduction, and more!
In real estate photo editing, there are countless tweaks you could make to enhance your images. However, not all edits are created equal—some have a far more significant impact on your listing’s appeal.
This article will explore seven essential real estate photo editing techniques that can elevate your property photos. From adjusting color balance and saturation to decluttering and fine-tuning texture details, these edits focus on key visual elements that attract potential buyers and make your listings stand out.
Why Edit Real Estate Photos?
Before preparing for an open house, you must prepare for a successful listing. Online listings are the first place house hunters check, and these online advertisements rely heavily on photographs to make a strong impression.
Post-processing edits are nearly always necessary no matter how professional the listing photos appear. Even the finest shots can benefit from minor adjustments in brightness, contrast, or saturation to effectively showcase the space’s ambience.
Editing also removes minor imperfections or distractions that could detract from the property’s appeal, ensuring the focus remains on the home’s best attributes. This attention to detail in the presentation can help properties attract more views and, ultimately, lead to more successful showings and sales.
7 Most Essential Real Estate Photo Editing Techniques
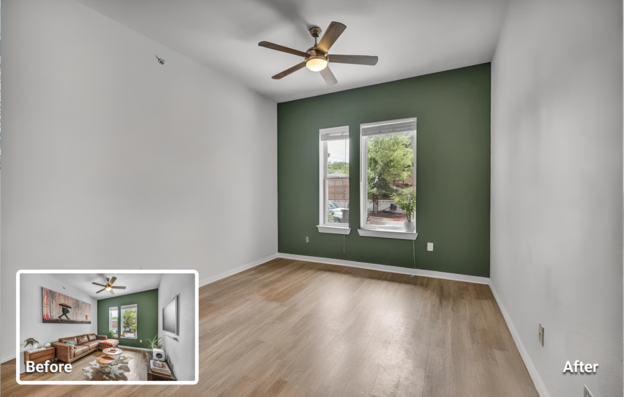
Virtual staging
Unfurnished properties tend to disappoint house hunters, who often struggle to visualise a space’s potential. Without furniture and decor, rooms can appear smaller and less inviting, making the whole imagination task too difficult for buyers!
That is why virtual staging is a crucial edit for real estate photos. Digitally placing furniture and decor in an unfurnished house makes it easier for potential buyers to see the home’s potential. As a real estate photographer, you can learn the technique using Adobe Photoshop or Luminar Neo software. As a real estate agent, you should outsource this task to real estate photo editing companies.
The good news is that AI-driven real estate photo editing tools do not take as much time as manual editing and do not require the extensive training that traditional software might demand.
Object removal
At other times, you might notice items in a photo that distract from the property’s main features or negatively impact the overall aesthetic. Or maybe you’ve left a rogue comb or a toothbrush in plain view.
In such cases, you can digitally remove these headaches. This could range from removing cars from a driveway to eliminating clutter on countertops, erasing unsightly cables, or even editing lawn equipment or debris from the yard. Removing such objects can clean up the visual space and make the property appear neater and more spacious.
Sky replacement
The first photo on most listings is a front-view shot of the property exterior, often setting the tone for the entire listing. If the sky appears dull or gloomy, it can cast a less inviting light on the property.
Contrary to what many assume, properties look far more appealing under the twilight, with its warm hues and soft lighting. Nighttime or twilight shots add a cozy and welcoming atmosphere to house exteriors. The technique is known as “day to dusk” and involves digitally replacing the sky to mimic the early evening ambience.
Noise reduction
Noise reduction is another crucial technique in real estate photo editing, particularly when dealing with low-light conditions or high ISO settings. These settings convey high-noise images, which lead to graininess and distorted colors.
This visual noise will easily detract from the clarity and quality of the photos and make the property appear way less appealing. This adjustment ensures that your property photos come out on top with a clean and sharp representation of the property, making it more attractive to potential buyers.
Lens correction
Lens correction is another vital process in real estate photo editing that addresses distortions and imperfections caused by camera lenses. Wide-angle lenses, often used to capture more of a room in a single shot, can sometimes create distortions. These distortions include curved lines–instead of crisp, straight edges–or skewed perspectives that make spaces appear larger or smaller than they are. Correcting these distortions ensures that the property’s architectural integrity is accurately represented.
Remember that maintaining the property’s actual dimensions and layout is not only visually necessary but also a regulatory must for listing a property. Therefore, to avoid potential misunderstandings or disappointments from prospective buyers, employ lens correction techniques in your photo editing process.
Color cast removal
Natural light in exterior shots or artificial lighting inside a property can sometimes introduce unwanted color tints to the photos. These are known as color casts. They can give walls, furniture, and even the overall space an unnatural hue, which might misrepresent the actual colors and feel of the property. This is why removing color casts is a pivotal edit in the real estate photo editing process.
By correcting these color imbalances, the photos more accurately reflect the property’s interior, showing true-to-life colors that appeal to potential buyers. Such edits can help ensure that the property looks as inviting and vibrant as it does in person and help buyers visualise the actual space without the distraction of odd color tones.
Hue-saturation adjustment
Hue-saturation adjustment is an indispensable technique in real estate photo editing. It fine-tunes color intensity and image tones to ensure they look natural and appealing. By adjusting the hue, you can alter the color makeup of an image to correct any unnatural shades and enhance the overall mood of the photo.
On the other hand, saturation adjustments increase or decrease the intensity of colors in the photo. Such modifications can make colors pop for a more vibrant look or be subdued for a softer, elegant appearance.
Final Thoughts: Perfecting Your Real Estate Photos
Editing property photos is essential for any real estate marketing and advertising effort. However, there are two key things to keep in mind:
First, avoid going overboard and doing too much! Your listing could end up looking artificial. Strive for a balance between enhancing the space and keeping it relatable to potential buyers. Excessive or dramatic edits may create a disconnect, making the home appear too perfect or uninviting. So, just focus on highlighting the property’s best features without exaggeration. That way, you’ll also stay on the safe side of real estate photo editing best practices.
Second, if you plan to outsource your photo editing project, ensure your chosen provider is reliable. This is a given, but set clear expectations regarding timelines, edits, and revisions to prevent delays and confusion. Regular communication throughout the process is also key to ensuring the final images meet your standards and deadlines.
 POSTED BY